 |
The organization of project material is paramount to efficient woodworking, much time can be lost reacquainting yourself with workpieces previously set aside in the fabrication process, even if only minutes before. There exists a method of stock control known as the "Triangle Marking System" that enjoys widespread popularity in Europe, but surprisingly, is not well known in the Americas. It is simplicity in itself, and with few rules to obey, a wealth of information can be deciphered from even the most obscure component piece.
Observe these constants:
There, that's really hard isn't it?
Let's put this system to use right now:

On the left side top, we have what might be a cabinet sidewall (a vertical orientation) needing to be glued up. The component pieces are arranged in the desired combination for color, growth ring orientation, figure, or whatever the criteria is. A triangle is drawn across the workpiece in keeping with the rules from above. To the right of this assembly is the middle piece, pulled out for our inspection, and it immediately conveys a huge amount of information to us:
Lets stop here a minute and discuss that blue line. It's only blue for sake of clarification as to its purpose, in reality it's marked in the same color as the rest of the triangle. If you've only got one panel to make, the basic triangle will suffice, but what if you've got 2, 5, or even 8 similar subassemblies to make, how do you keep track of them? Study that blue hash mark for a moment and you'll see its facility as a counting device. Notice its presence on every piece that has a commonality to it (rule # 2). That's the key to its usefulness, so go ahead and strike as many hash marks as there are assemblies you need to make. With what you know now, the horizontal panel's particulars should be easily deciphered.
From this point forward, I'll be using illustrations starting with the lone triangle as the #1 designation, but I've found that using a hash mark as the #1 designator removes some ambiguity in the marking of smaller pieces. This is my personal preference, and you may well enjoy great satisfaction with the traditional starting point of the lone triangle.
Now let's try for something a little harder, something that will use both variants, like a doorframe.

Notice how we have relative positioning, not absolute. You still need to mark the intersection of the rails to the stiles, especially the intermediate ones, but life is oh so much easier now, and such marks usually do not conflict with each other. Naturally, the interior of this door will need 2 panels, but you already know how to infallibly mark those up, even if exact duplicates of each other are needed.
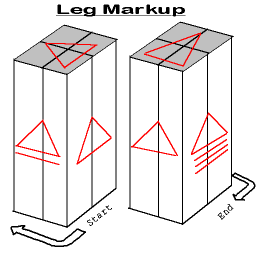
O.K., so how do we handle a three-dimensional project, so far it's only been in two? Table legs usually represent a severe headache for woodworkers, especially when trying to keep straight just exactly what faces receive mortises, aprons, or tapers:

Again, line up the stock with the criteria desired and pick out the best face of four to begin with. Proceed in a clockwise direction with the hash marks and triangles incrementally, ending as shown above. The triangle on top isn't necessary, but it serves as a double-check, so I use it.
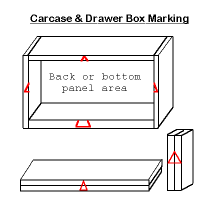
And now for the big money question- can we use this miraculous system to markup carcases and drawers? Well heck yeah, it wouldn't be much of a woodworkers marking system if we couldn't:

Up till this point we've had a mostly generous surface area to mark, but now we've got to use our system on some fairly thin edges, and this is where I definitely begin with hash marks as #1 to give a more positive component I.D. If there are interior dividers, it's important to cleanly mark the stock so as to avoid confusion. Here too, marking is relative and not absolute, so any shelf holes, dados, hinge locations, etc. need to be marked out also.
Well, now you know everything I do about the triangle marking system, and the best part is it's just like riding a bicycle: once you learn how, you'll never forget.
Bookmark This Page!
USE YOUR BROWSER'S BACK BUTTON FOR PREVIOUS SCREENS